Tessellations — tiling a plane using geometric shapes without overlaps or gaps — are a pretty fun way to teach students about shapes, symmetry, reflection and rotation. Plus, they require the most minimal of supplies!
Materials:
• Plain 3″ x 5″ index cards
• Scissors
• Scotch tape
• Blank white paper
• Optional: colored pencils/crayons, etc.
Procedure:
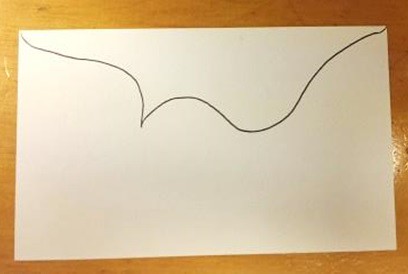
1. Draw a simple design from one corner of the sheet to an adjacent corner. (Do not draw diagonally). Stress to the students that they must draw from corner to corner on this first attempt. Do not stop halfway across!
2. Cut on the design line, being sure to have two pieces when done. NO TRIMMING ALLOWED.
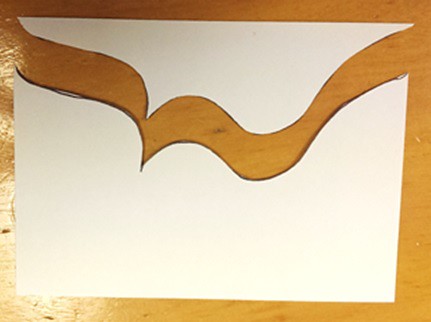
3. Slide the cut piece across the sheet to the opposite side and tape the straight edges together. The corners of the original card and the cut piece should match perfectly.
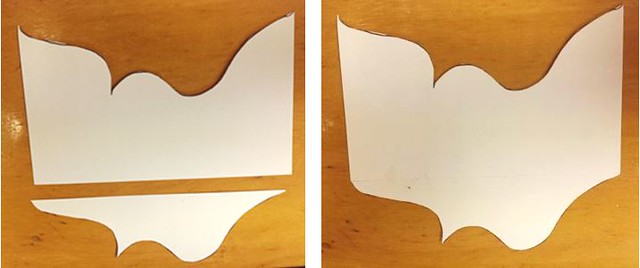
4. Repeat the procedure for one of the short side sides. Key points to remind students:
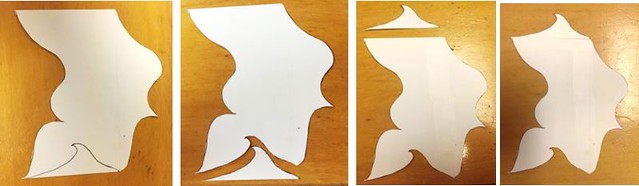
- Do not flip the cut pieces of your index cards
- Do not overlap the edges of your cut pieces
- Make sure you only cut one long side and one short side. The cut pieces will attach to the opposite straight edges
- Cut exactly from corner to corner
- When taping your cut piece to a straight edge, make sure everything lines up
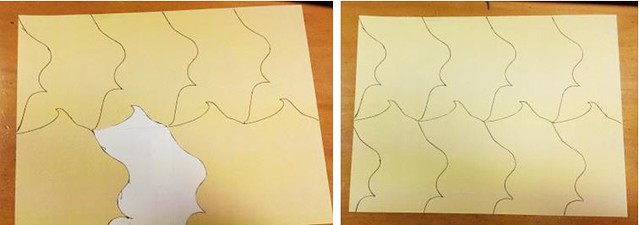
5. Once you have a completed pattern for your tessellation, place it anywhere on a piece of paper and trace around it. This example is squared up with the original index card edge and the paper’s edge, but this is not necessary.

6. Move your pattern so that its edges match up with the outline you drew. If done correctly, they should fit snugly together like a puzzle piece, leaving no gap. Trace around your pattern when it is in position.
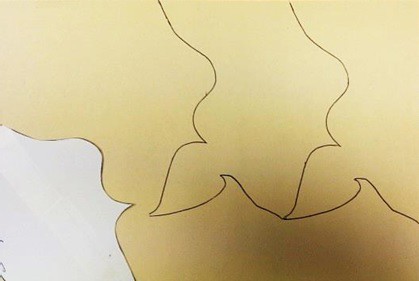
7. Continue moving and tracing your pattern until your page is filled with your pattern’s outlines.
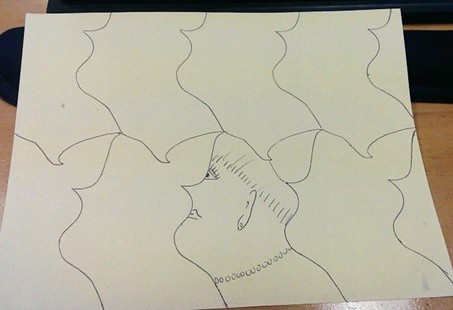
8. For extra fun, and in homage to M.C. Escher, you can add some details to your artwork!
Background:
A tessellation is created when you cover a surface with a repeating pattern of shapes, making sure there are no gaps or overlapping pieces. The word “tessellation” comes from the Latin word “tessella.” Tessella were tiny squares of stone that were used to make large mosaics. The patterns for these mosaics were usually intricate and often geometric. This tradition continued in many different cultures, but is particularly well recognized in the Moorish artwork of Morocco and southern Spain. More recently, M.C. Escher applied the concept of tessellations to less geometric and more fantastical shapes. You may also recognize tessellations in nature in the form of bee hives, snake scales, and the outside of a pineapple.
Regular tessellations are made by repeating squares, hexagons and equilateral triangles – all regular polygons. If you figure out the interior angles of these three shapes, you might note something interesting…
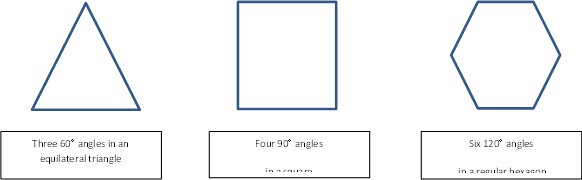
All of these numbers — 60, 90 and 120 — are evenly divisible into 360 degrees. This means that they fit together extremely well and make filling a space easy, either while touching themselves, as in triangle to triangle, or each other, as in triangle to hexagon. When you combine these three shapes to make a pattern, you are creating a semi-regular tessellations.

When creating tessellations, it is important to understand reflection symmetry, rotational symmetry and point reflection.
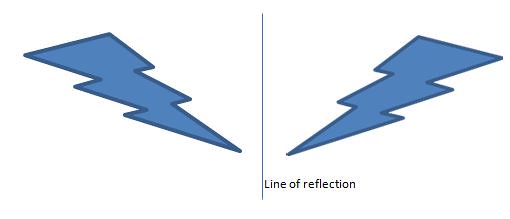
Reflection symmetry occurs when you can easily divide an item into two and the two halves are identical. The dividing line is referred to as the line of symmetry.
With rotational symmetry, the polygon is rotated around a central point, without leaving the surface you are working on.
Point reflection occurs when you create a mirror image of a shape. Reflection is not terribly important if you are using the shapes in a regular tessellation as they are all perfectly symmetrical when divided in two. Reflection becomes much more important when you are using fluid shapes. This concept is important for students to understand as they make their tessellations. Their shapes won’t fit together correctly if they have been reflected!
HMNS at Home is presented by Mitsubishi Corporation.