The beginning of the school year is an exciting time for teachers and students alike. We have a quick science activity here that will engage new students and make your room too cool appropriately cool for school: Shrinky Dinks.

There are myriad of ways you can use this activity, so the application is up to you, but I am envisioning name plates or name tags, zipper pulls for pencil bags, cubby or tote markers, key chain fobs … the possibilities are endless!
Materials:
No. 6 plastic
Sharpies, colored pencils, or an inkjet printer
Sandpaper
Scissors
Oven or toaster oven
Parchment paper
Non-insulated baking sheet or flat piece of cardboard
Hole punch
Procedure:
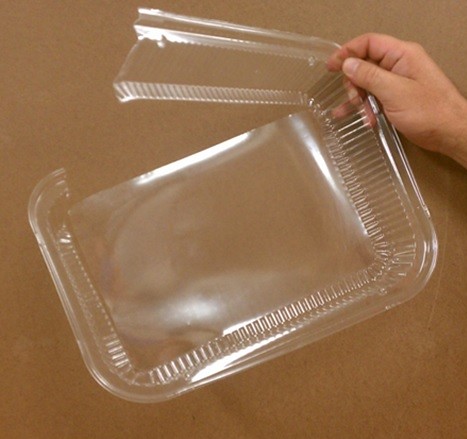
The first thing you need to do for this project is to gather is No. 6 plastic, also known as polystyrene. Polystyrene is hard and clear and often used in protective packaging like deli containers. While it can be tricky to recycle, recycled polystyrene can be used in manufacturing rulers, license plate frames, vents, switch boards, and thermal insulation items. Oddly enough, No. 6 plastic can also be whipped into a foam and made into Styrofoam.
For this example, I saved a bunch of lids from aluminum takeout containers, but you can use just about anything that is rated No. 6. If you want to make an image that will shrink evenly, you will need a piece of plastic that has been stretched evenly. Corners, cups and edges can be unpredictable because they are stretched and molded in multiple directions.
“Plastics are made of long chain-like molecules called polymers. Because polymer chains are so long, they can be manipulated to create a wide-range of properties — in this case for No. 6 plastic, polystyrene. Polystyrene is a thermoplastic, meaning the long polymer chains are heated and stretched, then cooled to form the plastic sheet. The polystyrene remains in this “stretched out” state unless something causes it to change. The cool thing about thermoplastics is that upon reheating the plastic, it reverts to its original state, in other words, it shrinks. This is the same process used to “shrink wrap” items like food containers or other products that have protective plastic wraps.” Lori Steward, Middle School Science
I decided to try something different this time, so I cut the unpredictable edges off my plastic lid in order to get a flat piece of plastic I could trim and run through the printer.
(If you decide to use sharpies in your project, you can give your students a piece of plastic and a set of sharpies and let them get to work. The sharpie will adhere to the plastic with no problems. If you want to use colored pencils or an ink jet printer, you will need to scuff up your plastic so that there is a bit of texture for the color to stick.)

I knew I wanted to cut around the outline of my long-horned beetle, but for students you might want a standard shape like rectangles for name tags or zipper pulls. You might also consider using a die cut to make a particular shape — like circles or the school mascot.
If you want to attach a cord or a ring to your shrink dink, you MUST punch a hole in it BEFORE you bake. The standard sized hole punch shrinks considerably. I always have the urge to use a smaller hole punch, but then I can’t fit anything through the remaining hole.

Before baking.The larger hole is a standard sized hole punch. The smaller hole is a mini punch.
SO! After I ran the plastic through the printer, I trimmed around my shapes. The “painted lady” was easy as it was a rectangle, but the beetle was trickier. Since No. 6 plastic is pretty thin and brittle, corners are delicate. You can see in the picture that I had a bit of a problem around the beetle’s tarsal claws. No worries though; the plastic gets tougher as it shrinks.

Now get out your baking sheet. I like putting a piece of parchment paper down on the baking sheet to protect the surface that you might otherwise put cookies on, but it isn’t totally necessary. If you do decide to use parchment paper, it has a tendency to curl, so you may need to wad up the paper and flatten it back out before using it.
Place your decorated plastic on the cookie sheet and place the sheet in the oven to bake the plastic for 2- 3 minutes on 325 to 350 degrees. Each oven is different, so watch closely!
Danger Note: You are already working with heat, but you might also be working with a possible human carcinogen. No. 6 plastic has been found to leach styrene, so if you choose to do this craft make sure it is in a well-ventilated area!
You will see the plastic curl up and then flatten back out. Wait about 30 seconds longer than you think you need to. Then wait a few more. It is extremely tempting to take the shrink dinks out before they are totally ready, but waiting longer than necessary doesn’t really hurt anything. So resist!
Occasionally your shrinky will decide to stick in a single spot. Not to worry! When you pull the items out of the oven, immediately use something hard and flat, like the bottom of a pie pan, to press out any uneven spots. If you aren’t quite satisfied, you can actually stick your shrunken piece back in the oven and reheat it until it is soft.
Once you remove the piece from the oven, it cools very quickly, so you can handle it almost instantly. I usually pull the cookie sheet out, flip the piece on the kitchen counter and press it flat for a few seconds. By the time I have done all of this, 30 seconds or so, the piece is ready to hold.
How much shrink can a shrink dink shrink? About this much.

The image on the left is the starting size and the image on the right is the finished size.
Final product!