


The days just after Thanksgiving are always busy at the Museum. There are flurries of children on field trips, shoppers looking for that unusual and prefect gift and, my favorite, the annual installation of the holiday trees in the grand hall. The trees, which are decorated by local area non-profits, celebrate a variety of themes and causes and are not to be missed. My particular favorite each year is the tree decorated by the Houston Conchology Society. My department also gets to decorate a tree and it is always an ode to science. This year’s theme: Cephalopod Christmas. How can you go wrong there?
We know you will be out to visit the trees this year, and we assumed that you would want a cephalopod for yourself so I whipped up this little tutorial for your very own pet squid. He’s adorable. He’s a cephalopod. Most importantly, he doesn’t have to be fed, walked* or cleaned up after.
(*You might look really awkward trying to take your cephalopod for a walk.)
Materials:
1 Paper towel tube
1 Toilet paper tube
Paint – color of your choice
Paint brush
Scissors
String, yarn or thin ribbon – 2 to 3 feet.
Tape
Straw
Glue
Black permanent marker
Stapler
Procedure:
- Color your tubes with the paint of your choice. (Don’t clean up the paint quite yet. You’ll need it again in a minute.)

- Set the tubes aside and let them dry.
- Pinch one end of the toilet paper tube shut.

- Use scissors to cut a 45 degree angle off each side of the tube so you now have two triangle pieces and a pointy tube.

- Use a stapler to keep the tube flat. I aligned my staple with the length of the tube so as to not get in the way of the next step.

- Use the scissors to cut 8 legs from the paper towel tubes. The legs should go up the tube about 2/3 of the way.
- Use the rest of the paint to color the pieces you cut off – both sides and the inside of the legs you just cut. The legs may get a little floppy when they are wet with paint, but don’t worry – they’ll firm up when dry. If you have some weird delaminated bits, you can always add a little bit of glue.

- Once everything is dry, cut one of the triangle pieces down the fold so you have two pieces. Cut the other triangle piece into two feeding tentacle pads.

- You are going to use the halved triangle pieces to make the fins of your squid. Apply a little bit of glue to the hypotenuse of the two triangles (opposite the 90 degree angle) and slide them in between the two pointy bits of the toilet paper tube – one on each side. The 90 degree angle should be the part sticking out and making the fin.


- Now grab the paper towel tube. Use the scissors to shape the legs as you see fit. I like mine a little bit more realistic but, really, you can leave them as is.
- If you so choose, you can also curl or shape the legs for more realistic appearance. For mine, I did this by rolling the legs over a round marker – switching from the inside of the leg to the outside of the leg every so often.
- Now, glue the feeding tentacles to the string. You can also staple or tape them on as you see fit. Go crazy.

- Tie the middle of the string into a small knot. This will give you a little bit more material when you attach the feeding tentacles.

- Holding onto the knot, drop the feeding tentacles down through the uncut end of the paper towel tube.

- Staple, glue or tape the end of the knot to the edge of the paper towel tube to secure it in place.

- Cut a 2 ½” to 3” slit in the uncut end of the paper towel tube. This will allow you to overlap these edges and fit the “legs” into the “head”.

- Now let’s make a siphon. Cut a straw slightly longer than your slit. Let’s say 3 ¼” just for fun.
- Flatten the straw a bit and then attach the straw to one of the edges of the slit you just made.

- Curl the side of the slit without the straw behind the side of the slit with the straw. Then, fit the “legs” into the “head. Push it all the way in.

- Once you know it fits, take the “legs” out, put a little glue on the top edge and fit it back into the “head”.


- Last step! We need to add some eyes! Using your black permanent marker, make two dime sized circles on your guy on the “leg” piece between the “head” and the legs. They should line up approximately with your fins.

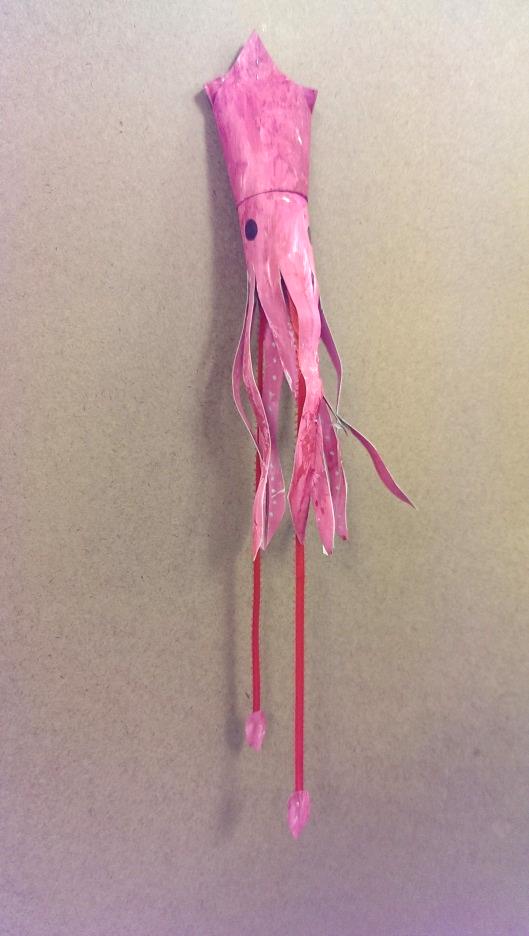
- Done! Enjoy your pet squid and take him on lots of walks to the park. Squid love going on walks. Here’s the final product.I have named him Maurice.
HMNS at Home is presented by Mitsubishi Corporation